- What is Soulanma?
- Getting started with flowcharts
- Getting started with mind maps
- Getting started with wireframes
- What can you do with Soulanma?
- Using Soulanma Boards
- Working with Soulanma's infinite canvas
- 5 ways to create a new file
- Getting started with Soulanma AI
- How to create a new workspace
- How to use AI-assisted mind mapping
- Customizing file and folder icons
- Mentions in Soulanma files
- Customizing diagram shapes
- Getting started with sequence diagrams
- Using the command menu
- Commenting in Soulanma files
- Getting started with flowcharts
- Getting started with mind maps
- Getting started with wireframes
- Using Soulanma Boards
- Mentions in Soulanma files
- Customizing diagram shapes
- Using sections on the Soulanma canvas
- Sketch on the canvas with freehand drawing
- Annotating files for more detail
- Text-to-object pasting options
- Adding and displaying links in Soulanma files
- Linking to sections and objects
- How to draw a line
- How to filter selected objects
- Presenting in Soulanma
- Voting on sticky notes
- Using the timer in boards
- Working with the grid and auto-alignment
- Working with connectors
- Does Soulanma have cloud architecture icons?
- Using tables in Soulanma
- Using sticky notes in boards
- Optimizing performance in larger boards
- Using spellcheck
- Setting custom thumbnails
- How overlays work in Wireframe mode
- Why are the colors of some board items toned down?
- How to add emojis
- Hiding cursors while collaborating
- Measure between objects in Boards
- Uploading files to Soulanma
- Getting started with sequence diagrams
- Working with Mermaid code in Soulanma
- Keeping boards tidy with alignment, distribution, and auto-layout
- Customizing file and folder icons
- How to draw a line
- How to filter selected objects
- Markdown support in Soulanma
- Does Soulanma have cloud architecture icons?
- Embedding external content into Soulanma
- How overlays work in Wireframe mode
- Moving and copying files
- Using Soulanma on mobile
- Does Soulanma have a dark mode?
- File version history
- Why are the colors of some board items toned down?
- Does Soulanma support offline mode?
- Teams, workspaces & sections explained
- Does Soulanma work on iPad?
- Free viewers commenting in workspaces
- Soulanma desktop app
- Is Soulanma available in other languages?
- Inverting the zoom direction in Soulanma so it works more like Sketch
- Troubleshooting issues and reporting bugs
- How to add emojis
- Team FAQs
- How to restore deleted files from the trash
- Searching in your Soulanma workspace
- Organizing files in your workspace
- I’ve upgraded but still don’t have access to the paid features
- Why can't I edit my files?
- Reporting content in Soulanma
- Does Soulanma have an affiliate or referral program?
- Collaborating with others in real time
- Sharing files and managing access permissions
- Hiding cursors while collaborating
- How to switch between workspaces
- Sharing feedback and feature requests
- Notification inbox
- How to change or reset your password
- Inverting the zoom direction in Soulanma so it works more like Sketch
- Customizing your notifications in Soulanma
- How to verify your Soulanma account
- How to delete your account
- Adding your name and avatar to your account
- Changing your account email address, or adding a new one
- How to create a new workspace
- Teams, workspaces & sections explained
- Free viewers commenting in workspaces
- Requesting file access
- Workspace discovery settings
- Sorting files and folders
- Changing workspace members’ roles
- Adding and removing members
- Team FAQs
- Creating and managing teams
- Requesting workspace editor access
- Linking between files
- Member roles in Soulanma
- How to delete a workspace
- How to upgrade your workspace
- Guest access
- Changing your workspace name, logo, or URL
- Collaborating with others in real time
- Offboarding users
- Sharing files and managing access permissions
- How to switch between workspaces
- Consolidating workspaces
- Uploading files to Soulanma
- Organizing your work with tabbed folders
- SAML
- Setting up SAML session expiry
- Security
- Prevent new workspace creation
- Soulanma app for ChatGPT
- Embedding & integrating boards with Jira Issues
- Integrating Soulanma with Google Docs
- Embedding files in ClickUp views
- Embedding files in Asana
- Embedding Soulanma files
- Creating Jira & Confluence Smart Links for Soulanma Files
- Embedding files in Guru
- Embedding files in Trello
- Embedding & integrating boards in Notion
- Integrating Soulanma and GitHub
- Embedding files in Zendesk
- Support Soulanma embeds in your app with EmbedKit
- Soulanma previews and notifications in Slack
- Embedding files in Canva
- Integrating Soulanma and Linear
- Embedding files in Nuclino
- Embedding files in Monday
- Embedding files in Medium
- Embedding files in Slab
- Embedding files in Coda
- Soulanma API (Beta)
- MCP
- Soulanma MCP - Supported tools
- Soulanma Desktop MCP
- Soulanma Remote MCP
- Reporting content in Soulanma
- SAML
- SAML SSO in Soulanma
- SAML SSO with Okta
- SAML SSO with Auth0
- SAML SSO with OneLogin
- SAML SSO with Microsoft Entra ID (Azure AD)
- SAML SSO with Google Workspace (previously G-Suite)
- SAML SSO with Active Directory Federation Services (ADFS)
- SAML SSO with other identity providers
- Setting up SAML session expiry
- Managing email changes with SAML and SCIM
- SCIM
- Setting up SCIM with Okta
- Setting up SCIM with JumpCloud
- Setting up SCIM with Entra ID (Azure AD)
- SCIM provisioning with Groups in Okta
- SCIM user provisioning in Soulanma
- SCIM provisioning with Groups in Entra ID (Azure AD)
- Security
- Setting up Two-factor Authentication (2FA)
- Prevent new workspace creation
- Whitelisting Soulanma domains
- Signing in with your Soulanma account on multiple devices
- Contact us
SAML SSO with Microsoft Entra ID (Azure AD)
Here's a guide to get started with SAML SSO with Microsoft Entra ID for your Soulanma workspace, but for the easiest setup experience, use the pre-built Soulanma integration in the Entra ID.
If you prefer to set things up manually, here are a few things to keep in mind:
Note: SAML SSO is only available on our Business plan. You must be an admin to enable SAML SSO.
Soulanma also supports SCIM Provisioning with Microsoft Entra ID.
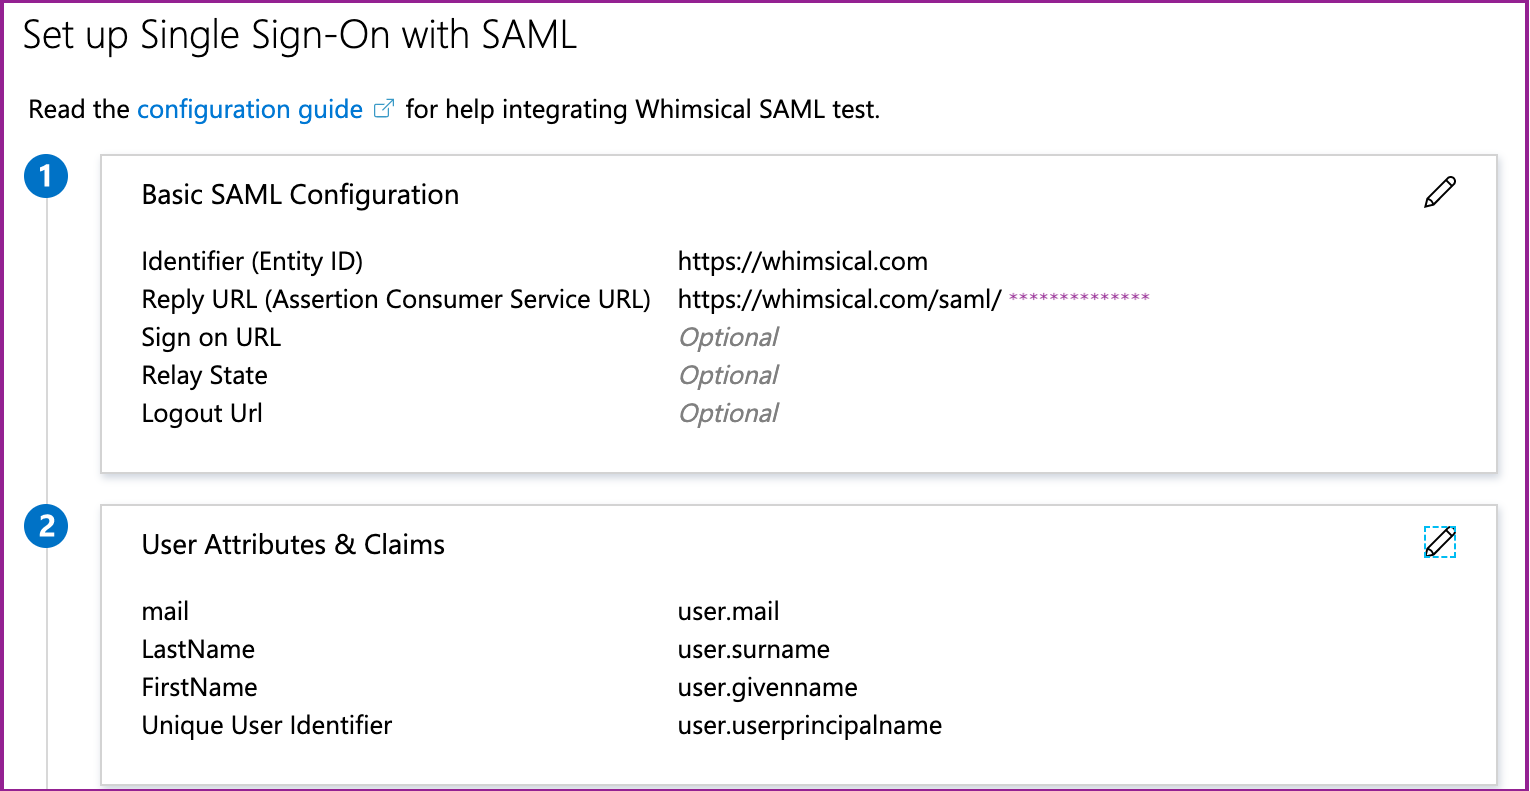
- The “Reply URL” value can be found in your Soulanma Workspace settings under “ACS URL”
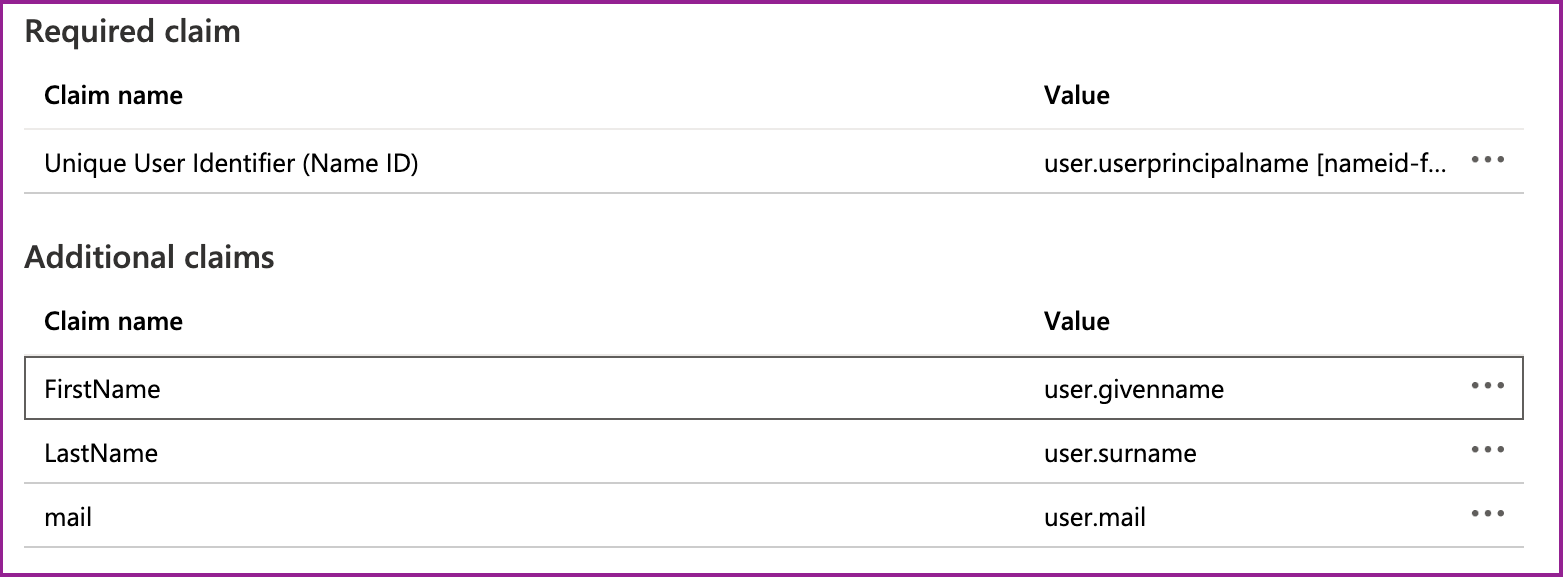
- The “User Attributes & Claims” must be without namespace, and the capitalization is important
Example of a complete, working SAML setup:
Listing of all claims/attributes:
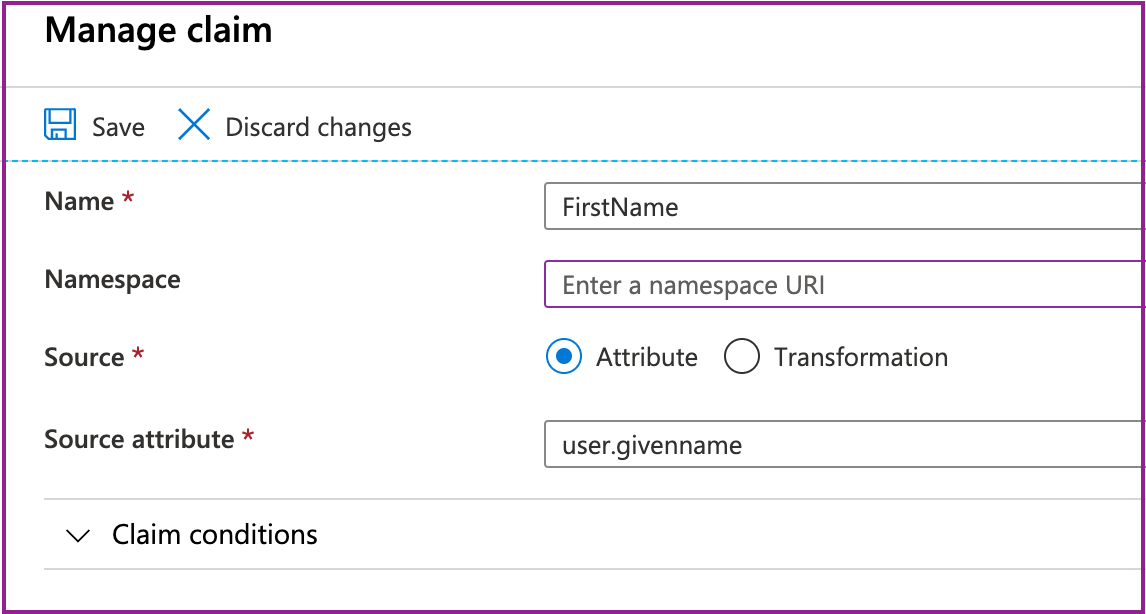
Example of how to remove the Namespace URI for a claim:
After SAML SSO is configured, you can go back to your Soulanma Workspace settings and adjust two more things:
- Default user role: Soulanma supports JIT (Just-in-time) account provisioning. That means that Soulanma will create an account for a user authenticating via SAML if necessary. New users will be created with the role and permissions you choose:
- Require SAML for login: You can enable this optional setting if you want to prevent users from accessing your workspace with other means of authentication, such as a password or via Google SSO.
There are some attributes that are the same for all identity providers:
- Entity ID: https://soulanma.com
- Name ID Format: email@address.com
- Username/Name ID: email@address.com
Soulanma uses the e-mail address of the SAML user to identify them on Soulanma. This will come up with configuration options like Name ID Format or Name ID. When in doubt, try to choose the option that will return the user's e-mail.
Important: If you have updated your workspace URL, the login URL will change to match. The ACS URL will not.
If you've configured your SAML login to use the login URL, you must update it for SAML to work.